4 minutes
Azure Password Protection Overview

Last week saw Microsoft announce General Availability for Azure Password Protection (APP) following a fairly lengthy spell in preview. This is an exciting feature release; bringing an end to the days of bespoke password filter DLL’s and adding much needed security, simplicity, and flexibility to password standards - backed by the power and intelligence of the Cloud.
What is it, and why should you use it?
Azure Password Protection extends the regular password complexity configuration of Azure AD, enhancing protection through the policing of user passwords and enforcement against a mix of automated and custom policies. It supports two main functions:
Restricting the use of common, or poor passwords through validation against an administrator defined custom password list and the “global banned password list”. This latter “thing” is a dynamically generated and maintained database - managed by the Azure AD Identity Protection team - comprising commonly used and frequently compromised or breached passwords based on behaviour and attack detections across the Microsoft Cloud.
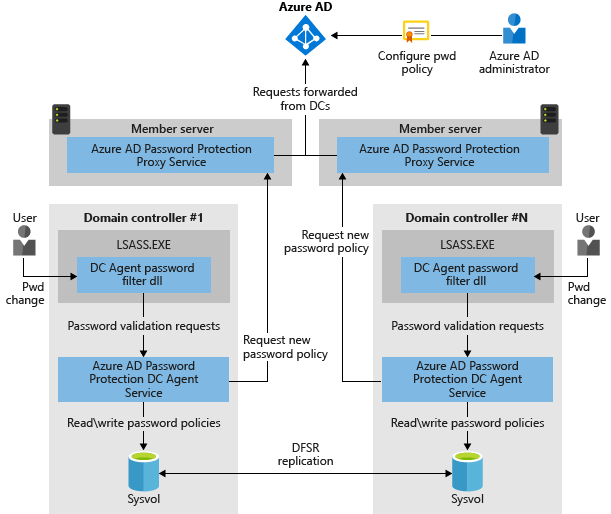
Extending the protection afforded by Azure AD to on-premises environments, enabling customers to benefit from the security advantages introduced via APP in traditional Domain Services environments. This is achieved through the deployment of a combination of Domain Controller Agents (whose role it is to process password validation requests), and the Password Protection Proxy service (which supports communication with Azure AD - relaying the APP policy to each DC Agent when requested) - depicted (ever so helpfully) in the below diagram from the Microsoft APP documentation:
How does it work?
The approach taken by Microsoft in enforcing banned passwords is a really interesting one… You might expect the service to apply a fairly crude yes / no approach when assessing user selected passwords, but there’s actually a lot more that goes into the evaluation process than you’d imagine. The steps are explained in detail in the Microsoft documentation, but by way of an overview, consist of the following:
Normalisation: This stage focusses on performing common character substitution (0>o, $>s, 3>e etc.) and removing upper case characters to support the matching of user selected passwords against entries in the global or custom blocklists. This (in Microsoft’s words) “allows a small set of banned passwords to be applied to a much larger set of potentially weak passwords”.
Fuzzy Matching: This is applied to the normalised password, ensuring that any proposed password is removed by more than one “edit degree” from a banned password. This step also verifies that the users first and last names, along with the Azure AD tenant name are not present in the proposed password (post normialisation and fuzzy matching).
Score Calculation: This final step applies a score to the output of the first two steps. A single point is assigned to each banned password reference, along with a point for each additional unique character. If the resulting score exceeds 5 points (and aligns with any other policy requirements - e.g. password length), the password is accepted. If not, the password is rejected on the basis that it fails to match the required level of complexity.
Deployment & Next Steps
First things first, you should be aware that to benefit fully from APP you need to have Azure AD Premium licenses. For Cloud-only Azure AD accounts (i.e. those provisioned directly as opposed to those synchronised via AD Connect) you can evaluate the use of passwords from Microsoft’s global list for free, but that aside you’ll need an Azure AD P1 or P2 licenses.
Assuming you’re correctly licensed, all of the settings you’ll need are located in the Azure AD portal under Authentication Methods > Password Protection. From here you can configure Smart Lockout thresholds, your custom banned password list, and integration with on-premises Domain Controllers if desired. Whilst I’m not covering the steps associated with the latter element in this post, those that are should refer to the to the On-Premises Integration Deployment Guide - paying particular attention to the pre-requisites. I’d also suggest reviewing the steps for High Availability. Absolute uptime of the proxy servers isn’t necessary, but an understanding of the interaction between DC Agents and the APP service is likely to serve you well…
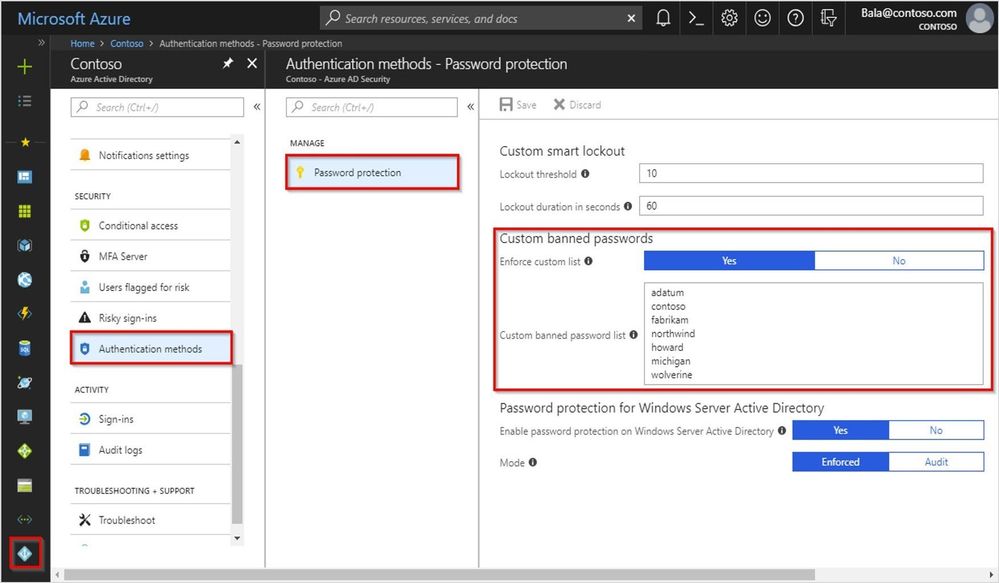
…it really is as simple as those few settings 🙂
For me, this is one of those “no brainer” features that all organisations should consider where licensing permits. There will be many who want to consider integrating with on-premises domains - leveraging the additional control that this provides in helping to secure the use of poor passwords, but equally there’s huge value in being able to benefit from the intelligence that Microsoft bring to the table via the Identity Protection team.
Take a look, and feel free to respond with any comments or experiences you have. I’ll likely go into more depth on deployment and on-premises integration in a future post. In the meantime, happy playing 🙂
Azure Azure AD Microsoft Passwords Security
Azure AD Identity Microsoft Security
807 Words
09-04-2019 20:47